Update: Chrome is re-working its Feature-Policy headers and the tips in this article are not working anymore. I will update the post once it works back.
All Webperf experts will tell you, one of the major performance issues on websites is image weight. In this article, I will detail an easy way to spot problematic images while browsing on your pages. By problematic images, I mean:
- images loaded much larger than their display size,
- images not compressed enough.
This approach is easy to set up. It uses a technology recently added to the web developer’s toolkit: Feature-Policies.
Let’s give credit where it is due, I have discovered the approach on Tim Kadlec’s blog.
Prerequisites
- Google Chrome
- No pending task on your browser, because you will have to restart it
- 4 minutes of your time
A few technical details before starting
A Feature-Policy is an HTTP header that allows to enable or disable some browser options on a given page. We will pay more attention to two of them: oversized-images and unoptimized-images.
Using them can seem touchy but it is actually very easy. We will specify proportional thresholds on all images dimensions and weight. If an image exceeds the rules, it shows as a gray rectangle.
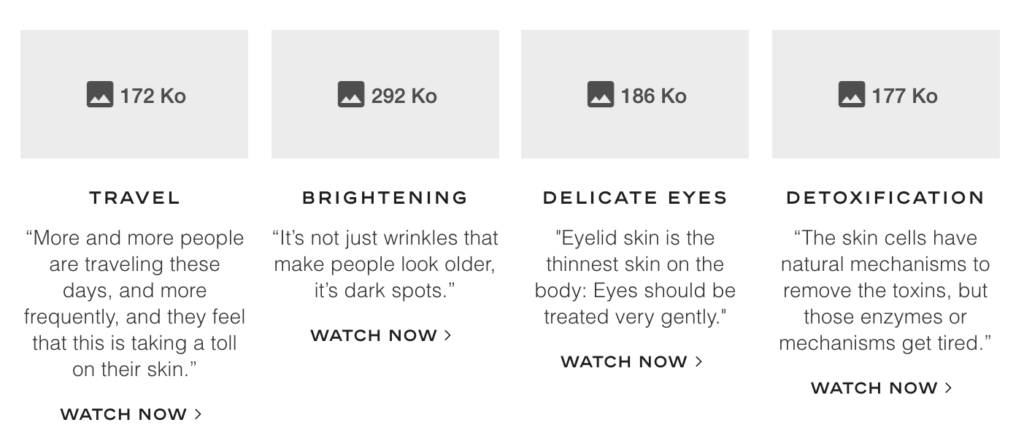
Here is an example with four uncompressed images:
The browser also writes an error message in the console:

You may tell me “Adding an HTTP header to the page, what a pain”. Not at all. There are some Chrome extensions that allow you to add any header you want to any page you visit. Let’s configure that!
Configure your browser
- You need to activate an experimental feature on your computer, but don’t worry, it is without risk. Enter about:flags in a new browser’s tab, find the line “Experimental Web Platform features” and switch it on.
- Restart your browser.
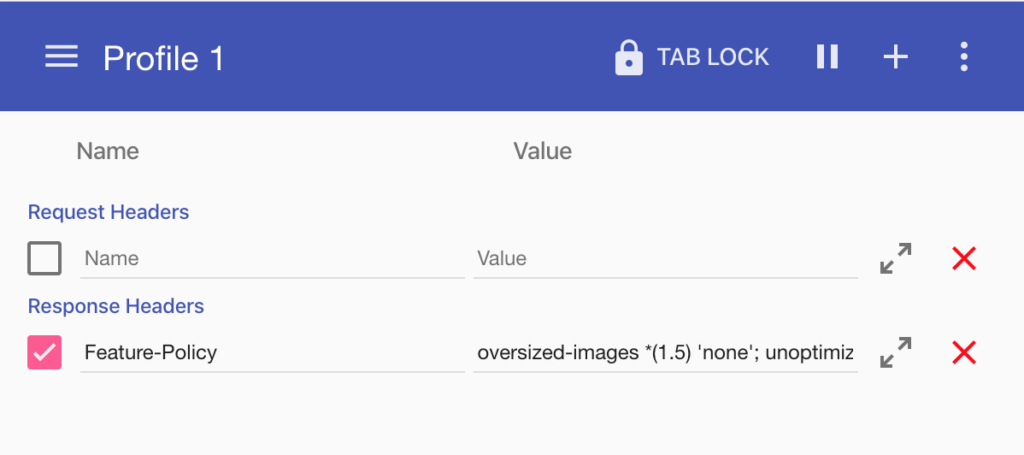
- Then, find and install an extension called ModHeader (or click on this link).
- Click on the extension’s logo on your browser’s top-right corner to open its settings. Add a new “Response Header” rule (make sure you are not creating a “Request Header” rule).
- In the new rule’s “name” field, insert
Feature-Policy - In the new rule’s “value” field insert
oversized-images *(1.5) 'none'; unoptimized-lossy-images *(0.3); unoptimized-lossless-images *(0.8); - Done! Reload a page to see the result.
Note: the HTTP header will stay enabled on every page you will visit later on. Click on the extension’s Pause button to disable it.
More about the chosen rules
Let’s review the three rules I suggested for your Feature-Policy header:
oversized-images *(1.5) 'none'; unoptimized-lossy-images *(0.3); unoptimized-lossless-images *(0.8);
Dimensions
oversized-images *(1.5) 'none';
This rule tells Chrome that an image dimensions should not exceed 1.5 times the number of physical pixels it is displayed on. Example: an image is displayed on 300×300 “CSS pixels” but the downloaded image is larger than 450×450, boom! It breaks the threshold and a gray rectangle shows up.
This rule takes in account higher density screens. It means that if your screen has a density of 2x (such as a Retina display), the browser will only complain if the loaded image is larger than 900×900.
Compression
unoptimized-lossy-images *(0.3);
This rule means that JPG images should not weigh more than 0.3 times the number of pixels in the image. Example: if the loaded image is 1000×1000 pixels, its weight should not be more 1000*1000*0.3 = 300KB.
unoptimized-lossless-images *(0.8);
Same with this rule, but on PNG images and with a higher ratio. This format keeps a neat image quality but is most of the time heavier. Example: a 1000×1000 image should not weigh more than 800KB.
How to test on mobile?
The simplest way is to combine our current approach with Chrome Dev Tools’ built-in mobile simulator.
How to fix detected image problems?
In the case of oversized images, there can be three reasons:
- The oversizing is intentional. It is meant to keep a good image quality (not pixelated) when it is displayed larger. Think of a screen-wide image shown on a large screen for example. You can handle this case by adding srcset and sizes attributes to your img tag.
- The oversizing is still intentional and dedicated to high pixel density screens. Same response: srcset and size attributes automatically deal with high density screens. You don’t need to specify which image to use on which density, the browser will do the maths.
- The oversizing was not wanted. You will need to manually resize the image, but once again, don’t hesitate to add srcset and size attributes!
In the case of insufficient image compression, you will have to use a specialized tool. There are dozens of them, free or paid, online or offline, manual or automated, for all kind or usage. An article will follow to present some of the most famous.